Bridge Design & Building Suggestions
Design and Planning
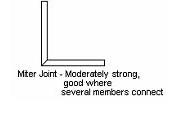
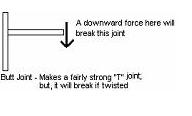
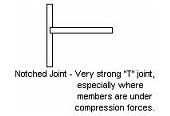
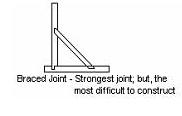
Start simple - Draw your design first, thinking about what will happen when you place a load on top of the structure. Think about the type of joints (i.e. miter, butt, notched, half-notch, braced, etc.) that you would use at each location where a joint is required. An important reminder, properly constructed joints will be stronger than the wood itself; therefore, the larger the number of joints used in your structure, the stronger the structure. One important concept you must consider is symmetry. Every member in one position of your structure must be mirrored in its corresponding location(s). You must maintain symmetry in your design from left-to-right, side-to-side, and top-to-bottom, If symmetry is not considered in your design, your structure will mpre-maturely self-destruct. Make sure that all of the specifications and criteria in terms of dimensional measurements have been met. (i.e. sub-structure - portion of the structure that extends below the support surface; span - minimum and maximum length; road surface - location of all loading points; height - maximum allowable height; width - maximum and minimum with to accommodate the loading plate and attached rod, super-structure and guide rails if applicable, minimum clearance from the support surface to the closest bridge member, etc.)
Make a full-scale diagram showing the placement of all members in your structure. this full-scale diagram will then be used as your working pattern upon which to construct your structure (i.e. cut, each member, trial dry fit, glue, clamp, etc.). Place this pattern on a piece of corrugated cardboard , cork or ceiling tile and then cover it with waxed paper so that the members after being glued will not stick to and pre-maturely destroy your pattern.
Types of Forces
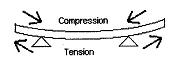
When a load is placed on the structure, the load tried to compress the top surfaces of the structure called compression. Simultaneously, the load tries to pull apart the bottom surface, which is referred to as tension.
Start simple - Draw your design first, thinking about what will happen when you place a load on top of the structure. Think about the type of joints (i.e. miter, butt, notched, half-notch, braced, etc.) that you would use at each location where a joint is required. An important reminder, properly constructed joints will be stronger than the wood itself; therefore, the larger the number of joints used in your structure, the stronger the structure. One important concept you must consider is symmetry. Every member in one position of your structure must be mirrored in its corresponding location(s). You must maintain symmetry in your design from left-to-right, side-to-side, and top-to-bottom, If symmetry is not considered in your design, your structure will mpre-maturely self-destruct. Make sure that all of the specifications and criteria in terms of dimensional measurements have been met. (i.e. sub-structure - portion of the structure that extends below the support surface; span - minimum and maximum length; road surface - location of all loading points; height - maximum allowable height; width - maximum and minimum with to accommodate the loading plate and attached rod, super-structure and guide rails if applicable, minimum clearance from the support surface to the closest bridge member, etc.)
Make a full-scale diagram showing the placement of all members in your structure. this full-scale diagram will then be used as your working pattern upon which to construct your structure (i.e. cut, each member, trial dry fit, glue, clamp, etc.). Place this pattern on a piece of corrugated cardboard , cork or ceiling tile and then cover it with waxed paper so that the members after being glued will not stick to and pre-maturely destroy your pattern.
Types of Forces
When a load is placed on the structure, the load tried to compress the top surfaces of the structure called compression. Simultaneously, the load tries to pull apart the bottom surface, which is referred to as tension.
Racking
Also, if symmetry was not considered in your design a third force called racking enters the picture. Racking attempts to skew or move the opposing sides of a parallelogram. To reduce racking, you will want to divide the parallelogram into two triangles by installing a diagonal brace. This brace will serve to attempt to keep the diagonal of the parallelogram constant.

Adhesives and Glues
Explore all of the options regarding the various glues that are available. There are wood glues (aliphatic resins), super glues (cyanoacrylates), model cements and epoxies. These adhesives/glues come in much different viscosity's that will affect the strength of your joint. A very highly viscous adhesive/glue will have a tendency to soak into the wood when applied and it will sometimes greatly increase the density and thus the weight of the wood. Some very low viscous adhesives/glues have solid particulates that will not allow the opposing sides of the joint to properly mate together to provide the strongest possible joint.
Try gluing scrap pieces of your wood together using the different types of glue you have available. Weight the pieces to see which of the adhesives/glue has the least affect on the weight. Then, try breaking and/or pulling them apart to see if you are able to determine the difference in their strengths. Then make your decision based on the the strength of the joint and the least increase in weight.
Read the warning labels on all products. Check to make sure that the adhesive/glue that you are considering is appropriate for the material (wood) used in your structure. If you use the super adhesives/glues, make sure that you also purchase the appropriate solvent in case you glue your fingers together.
One may combine adhesives. First use Elmer's Carpenter Glue very sparingly, clamp the wood pieces together and then place a drop of one of the super glues along the joint. The super glue acts as an accelerant for the Elmer's Glue. The Elmer's Glue permits extended time for the exact positioning of the pieces and then the super glue accelerates the setting time for the Elmer's glue.
Construction
The first step is to make sure that you have a large clear space in which to work, a smooth junky table that you do not have to worry about getting glue on will work best. If you do not have one available; then, protect the work surface with plastic. The actual surface upon wh. Do not br ich the construction takes place should be one in which pins may be inserted. I have found that an old cellulose ceiling tile, corrugated cardbord, or cork board work best.
During the construction phase, take your time to do things right the first time, do not rush. Do not be sloppy with the glue or glue container. Think about the size and weight of each piece of wood you are going to place in each location. An important reminder, properly constructed joints will be stronger than the wood itself; therefore, the larger the number of joints used in your structure, the stronger the structure. Make sure that all joints mate tightly together and leave no gaps. The adhesives/glues that you use may be able to fill in open gaps in your joints; but, it will not create as strong a joint as when the pieces of wood creating the joint, mate together tightly.
Prior to gluing joints, scrape each side of the joint to be mated together with a sharp blade. This will remove any natural oils from your hands and dust that contaminated the wood (while you handled it)and will affect the ability of the adhesive/glue to adhere to the wood.
Tools
Some of the tools that you will need include; but, are not limited to the following: a metric ruler, razor blades (safety-back type) or other sharp knife (exacto-knife), sandpaper, level, square, masking tape, pencils, exacto-saw blade that will fit your knife, and (most importantly) plenty of patience.
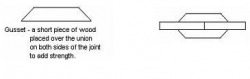
Joint Types